Ever since I heard the tame impala live album, I wanted the Juno 106.
The only thing was, it was insanely expensive, and I knew my parents would never let me get it, so I decided to make my own.
Original Synth

To start off, I chose the teensy 4.1 for this project because of the high price-performance ratio, and because of the teensy audio library, which makes the programming a lot easier
First, I wrote the software using the Teensy Audio Library. I used PureData to create a virtual midi instrument, which made testing a lot easier

Architecture
 First, there are 4 oscillators, the volume of which are controlled by a mixer.
They then go through the high and low pass filters, and are then modulated by the envelope.
The signal is then duplicated and sent into the flangers, and ultimately ends is output as a stereo signal that goes to the SGTL5000
First, there are 4 oscillators, the volume of which are controlled by a mixer.
They then go through the high and low pass filters, and are then modulated by the envelope.
The signal is then duplicated and sent into the flangers, and ultimately ends is output as a stereo signal that goes to the SGTL5000
There’s more complexity than this, as most of these blocks are modulated in turn by the LFO and envelope.
Hardware
Once I had the software done, I started working on the hardware.
In this case, it was pretty simple, I had midi in and out, and then a bunch of sliders buttons, and leds, which you use to change parameters.

Teensy and Audio Board pinouts

However, the teensy only has 48 pins, 12 of which are used for the audio board, 6 of which are used for power and ground, which only leaves about 30 for IO.
Additionally, I didn’t know that you could use IC’s to power multiple LED’s, such as the LM3914, so I wasted 9 pins on just LEDs.
Multiplexers
I settled on the idea of using multiplexers to read in all my inputs.
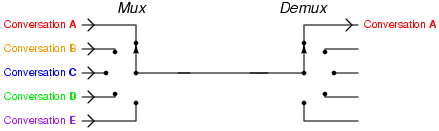
A multiplexer is a combination of logical gates that lets you read multiple inputs while only using 1 pin for input, and log base 2(n) pins for control.
You can think of it as one of those toy train switchers. Based on the input, a specific input line is connected to the output.
If you switch through the multiplexer really fast, it’s like you’re reading them all at the same time.
Another note: the way you address into an input is by inputting the number of that input in binary to the control pins
PCB Design
Next, I started designing the PCB in Eagle.
This part was really hard, as I had pretty much 0 hardware knowledge going into it, like I didn’t even know how an LED worked.
The process was really tedious, but I got through by watching a ton of youtube videos, and pretty much just copying elements from a bunch of other people’s designs.
One thing that surprised me was that 90% of my time was just spent researching components and reading datasheets. This is because for every component you add, you need to know how it works, find the the symbol, which is what it looks like on a schematic, the footprint, which is the shape it occupies on the pcb, and the 3d model, which lets you model the project in 3d. You then combine all of these in Eagle to make something called a library.
I did this for every single part that I used, which added a ton of time, and combined with the fact that there is no way to test if your circuit works or not, led to a lot of stress.
Once I had everything down, I had to route it.
I tried to route it by hand a few times, but as it was my first time, I ended up painting myself into a corner a lot, and having to restart.
I ended up just using the AutoRouter for everything, which turned out to be a horrible idea :)
After I finished the pcb, I ordered it on JLC PCB, the sponsor of this video (just kidding)
It was honestly a very cool experience, it takes about 3 days for them to build it, and then a week to ship it to you. And you can see the progress as the manufacturing process goes.
I bought the parts on Digikey, which is actually really dope, especially for canadians.
They have a policy where if you order over $100 (in CAD), the shipping is free, and if you order less than $100, the shipping is a flat rate of $8, and both options have tariffs included.
This is way better than other companies, one time I ordered $80 of parts and had to pay $40 shipping and $50 customs :neutral_face:
Soldering
Once I had all the parts, I soldered it together.
I started with the SMD components so that the board would be flat, and then moved to the through hole parts
I think my soldering really improved through this project: here’s my first ever solder for an example
Something that I noticed that’s kind of crazy is the amount of work that goes into designing these components. For example, they designed these potentiometers so that you can bend the legs down, so that it holds itself up and leaves your hands free to solder.
Once I had everything soldered, I went back to software.

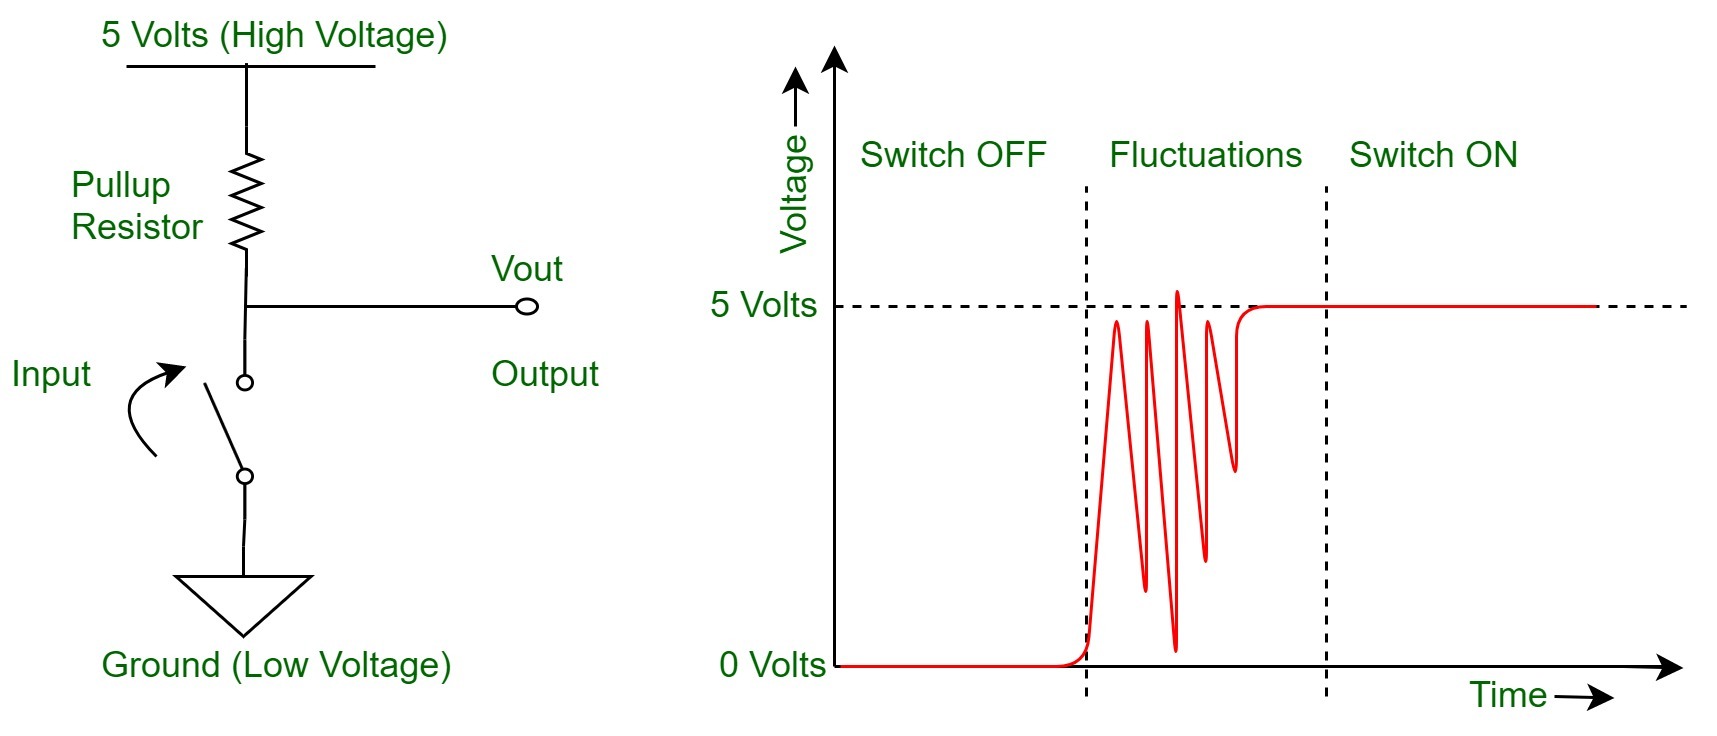
Debouncing
There’s this problem that happens when you actuate a mechanical switch, and if you’ve played minecraft before you might know what it is. It’s called contact bounce, or chatter.
Basically when you press down on the button, a combination of mechanical vibration and electromagnetic interference causes it to bounce up and down for a short period of time.
During this time, the reading is unstable, and can be a big problem if you don’t deal with it: thus, debouncing:
There’s a really cool and short algorithm I found to deal with it.
This is the first time I’ve ever used binary in programming, and it was really dope.
Basically, this function is called every n milliseconds, and uses digital logic to create a history of read-in states:
bool debounce (Button b) {
  bool temp = read_raw(b);
  state = (state<<1) | temp | 0xe000;
  if (start_state_1 == 0xf000) {
    return true;
  }
  return false;
}
Problems
I ran into a ton of problems while designing this, the most obvious being clearances.
I put the key switches way too close together, so you can’t actually put keycaps on them.
Not sure which is at fault here, but there’s a lot of weird behaviour I don’t understand with the multiplexers.
For example, if you poll every 200 ms (or another relatively long interval), it causes a weird delay sound in the synth.
If you poll with no delay, the multiplexer won’t be able to react fast enough to changes in the control pins, which means that inputs read consecutively will often return the same value
If you poll at a reasonable interval of 2-15 ms, these issues don’t happen, but some readings are still tied to each other.
For example, the noise parameter is at input 5, while the frequency of the low pass filter is at input 7.
But when you play a note, they are tied together.
The buttons are pretty much all shorted together, here’s which ones are connected:
8: 8, 0
7: 7, 8
6: 6, 7, 8

5: 5, 6
4: 4, 5, 6, 8
3: 3, 4

2: 2, 3, 4
1: 1, 2
0: 0, 1, 2, 4, 8

8 & 9
7 & 8 (and thus 9)
I literally have no idea why this happens LOL
The funny thing is I had enough pins to run the buttons directly to the teensy, which would be way easier, and also cheaper because I would need 1 less multiplexer, so I totally overcomplicated this.
Demo
TODO